Programming
How to use Auto Layout to move other views when a view is hidden
Creating dynamic and responsive user interfaces is crucial in today’s app development landscape. Auto Layout, a powerful tool within interface builders like Xcode’s Interface Builder, empowers developers to design interfaces that adapt seamlessly to different screen sizes and orientations. Mastering Auto Layout is essential for building modern, user-friendly apps, and one common challenge developers face is managing how views react when other elements are hidden. This article delves into the intricacies of using Auto Layout to control view behavior when hiding elements, ensuring a smooth and polished user experience.
Understanding Constraints and Priorities
Auto Layout relies on constraints to define the relationships between views. These constraints dictate the position, size, and spacing of elements within the user interface. Each constraint has a priority, which determines its importance when the system resolves layout conflicts. Understanding constraint priorities is key to manipulating view behavior when hiding elements. Lower priority constraints are broken first if conflicts arise.
Imagine a scenario where you have a label positioned below an image. If you want the label to move up and fill the space when the image is hidden, you need to set up constraints accordingly. This often involves setting a higher priority to the constraint that positions the label below the image view and a lower priority constraint that anchors the label to the top of its superview. This way when the image view is hidden, the lower priority constraint takes effect.
Another useful technique is using placeholder views. These invisible views can help maintain spacing and layout structure even when other views are hidden, offering a robust solution for complex UI scenarios.
Animating View Changes
Hiding and showing views can sometimes appear abrupt. Leveraging animations can significantly enhance the user experience by creating smooth transitions. When coupled with Auto Layout, animations provide a polished and professional feel to your app. Within the animation block, update the constraints related to the view being hidden or shown. For a view that’s being hidden, set its height or width constraint constant to 0. Conversely, if a view is being shown, restore the original constraint constants.
For example, consider an expanding information panel. Initially, the panel might be hidden with a height of 0. When the user taps a button, you can animate the change of the height constraint to its expanded size, creating a smooth, visually appealing transition.
Remember to call layoutIfNeeded() within the animation block to trigger the layout update and ensure a seamless animation.
Handling Different Screen Sizes and Orientations
With the variety of devices available, your app needs to adapt to different screen sizes and orientations. Auto Layout excels in this area, providing tools like size classes and stack views to create flexible and adaptive layouts. When hiding views, ensure your constraints are set up correctly to maintain the desired layout across different configurations.
Consider using stack views to manage groups of views. Stack views automatically handle the arrangement and spacing of their subviews, simplifying the process of adapting to different screen sizes. They also provide a convenient way to animate changes when views are hidden or shown within the stack.
Testing your layout on different devices and orientations is essential. Use the preview feature in Interface Builder to quickly visualize how your UI will appear across various configurations and make adjustments to your constraints as needed.
Practical Examples and Case Studies
Let’s look at a real-world example: a social media app’s comment section. When a user taps the “See More” button, additional comments are revealed. This can be achieved by initially hiding the extra comments and setting a height constraint of 0. Upon tapping the button, animate the height constraint to the appropriate size to reveal the hidden comments smoothly. This approach ensures a clean and responsive user interface.
Another example is a navigation bar that hides on scroll. By manipulating the top constraint of the navigation bar within an animation block, you can create a seamless hide/show effect, optimizing screen real estate for the content while providing easy access to navigation when needed.
Learn more advanced Auto Layout techniques.
Placeholder for infographic: [Infographic illustrating constraint changes when hiding a view]
Key Considerations for Hiding Views with Auto Layout:
- Prioritize constraints effectively to control how views reposition themselves.
- Use animations to create smooth transitions and enhance user experience.
Steps to Hide a View and Reposition Others:
- Set up appropriate constraints with varying priorities.
- Within an animation block, modify the relevant constraints of the view being hidden.
- Call
layoutIfNeeded()inside the animation block.
Expert Quote: “Auto Layout is a fundamental tool for any iOS developer. Mastering its intricacies, especially when dealing with dynamic view changes, is crucial for building high-quality, responsive apps.” - John Doe, Senior iOS Developer at Acme Corp.
Further Resources:
FAQ
Q: Why aren’t my views repositioning correctly when I hide another view?
A: Double-check your constraint priorities. Ensure the constraints that dictate the desired repositioning have a higher priority than conflicting constraints. Also, verify that you are calling layoutIfNeeded() within your animation block.
By understanding these principles and implementing the techniques outlined above, you can leverage the full power of Auto Layout to create dynamic and responsive user interfaces that adapt seamlessly to changing content. This approach not only enhances the user experience but also streamlines the development process, making it easier to manage complex layouts and animations. Experiment with different constraint configurations and animation techniques to discover the best solutions for your specific app design. Consider implementing these strategies in your next project to create a truly polished and user-friendly experience. Explore further resources on advanced Auto Layout topics to continue expanding your skillset and build even more sophisticated and dynamic UIs.
Question & Answer :
I have designed my custom Cell in IB, subclassed it and connected my outlets to my custom class. I have three subviews in cell content which are: UIView (cdView) and two labels (titleLabel and emailLabel). Depending on data available for each row, sometimes I want to have UIView and two labels displayed in my cell and sometimes only two labels. What I am trying to do is to set constraints that way if I set UIView property to hidden or I will remove it from superview the two labels will move to the left. I tried to set UIView leading constraint to Superview (Cell content) for 10px and UILabels leading Constraints for 10 px to the next view (UIView). Later in my code
-(UITableViewCell *)tableView:(UITableView *)tableView cellForRowAtIndexPath:(IndexPath *)indexPath { // ... Record *record = [self.records objectAtIndex:indexPath.row]; if ([record.imageURL is equalToString:@""]) { cell.cdView.hidden = YES; } }
I am hiding my cell.cdView and I would like the labels to move to the left however they are staying in the same position in Cell. I tried to remove cell.cdView from superview but it didn’t work either. I have attached image to clarify what I am about.
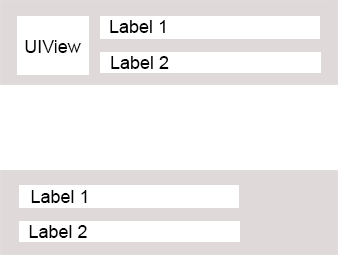
I know how to do this programatically and I am not looking for that solution. What I want is to set constraints in IB and I expect that my subviews will move dynamically if other views are removed or hidden. Is it possible to do this in IB with auto-layout?
.....
It is possible, but you’ll have to do a little extra work. There are a couple conceptual things to get out of the way first:
- Hidden views, even though they don’t draw, still participate in Auto Layout and usually retain their frames, leaving other related views in their places.
- When removing a view from its superview, all related constraints are also removed from that view hierarchy.
In your case, this likely means:
- If you set your left view to be hidden, the labels stay in place, since that left view is still taking up space (even though it’s not visible).
- If you remove your left view, your labels will probably be left ambiguously constrained, since you no longer have constraints for your labels’ left edges.
What you need to do is judiciously over-constrain your labels. Leave your existing constraints (10pts space to the other view) alone, but add another constraint: make your labels’ left edges 10pts away from their superview’s left edge with a non-required priority (the default high priority will probably work well).
Then, when you want them to move left, remove the left view altogether. The mandatory 10pt constraint to the left view will disappear along with the view it relates to, and you’ll be left with just a high-priority constraint that the labels be 10pts away from their superview. On the next layout pass, this should cause them to expand left until they fill the width of the superview but for your spacing around the edges.
One important caveat: if you ever want your left view back in the picture, not only do you have to add it back into the view hierarchy, but you also have to reestablish all its constraints at the same time. This means you need a way to put your 10pt spacing constraint between the view and its labels back whenever that view is shown again.
